

Do You Love Shabby Chic
Part 1- Hemp Oil resist
Do you love “shabby chic” furniture, that aged aesthetic made so popular by designer Rachel Ashwell? Do you stroll through your favorite antique shop and drool over pieces that have of older, chipping paint? If you said yes to either of these questions join us and learn how to get the chippy look.
Let’s think about those antiques with chips and dings in them. Those chips occur naturally on edges and sides of tables in what we like to call “high traffic areas”. Places that would have seen daily use and abuse. But, they also appear on flat areas over time usually from dampness and humidity or extreme cold.
The style speaks to a well-used piece of furniture. Today we’re going to share with you a great video as well as outlined all the steps necessary to get the chippy look.
Our friend Marion Parsons, a.k.a. Miss Mustard Seed, is the queen of chippy furniture. She has perfected this style with her brand of Milk Paint and finishes. It literally chips off as it dries, revealing whatever lies underneath.
In the world of decorative painting there are many ways to get paint to flake off for this aged look. Most of the time we use one of three different techniques to get the paint to chip. All of them work very well with Efex bendable mouldings.
A “resist” is a two step process where you layer a resist medium (like Hemp Oil) in between two coats of paint. Think of the resist as the frosting between two layers of cake, and the cake is your two paint colors. You can even do a resist over the initial painted or wood surface. Basically, the resist medium keeps the second coat of paint from adhering to the undercoat.
Three great resist techniques are:
•Hemp Oil resist with Milk Paint
•Wax resist with Annie Sloan Chalk Paint®
•Crud resist with Annie Sloan Chalk Paint®
Start your chippy journey by watching Miss Mustard Seed, in this great video. Then see the 4 easy steps on how to make this work for you.
Milk Paint Hemp Oil Resist
This painting technique is so easy, you can do a pretty big project in just a few hours over a weekend.
The Hemp Oil resist works best when using Miss Mustard Seed’s Milk Paint. First, if you are new to this technique, we recommend that you start by practicing on a sample board.
Step 1 – Pick two colors that you think will complement one another.
We did two sets of sample boards to show you how-to-do a Hemp Oil resist. Both had very different outcomes.
In example 1 Eulalie’s Sky is the base coat and Mustard Seed Yellow is the top.

In example 2 Ironstone is the base and French Enamel is the top coat. Paint one or two coats of your base color and let it completely dry. You want the base color to have full coverage, if you like mix the paint with the Bonding Agent for better adhesion. See how well the Milk Paint worked on the Efex Appliques? They are porous so the paint soaks in without needing the Bonding Agent.

Step 2 – Once the first color is fully dry, it’s time to apply the Hemp Oil! Make sure you apply it randomly, otherwise it tends to look spotty. One of the best ways to apply is with a spray bottle. Dilute the Hemp Oil down with odorless mineral spirits so the sprayer won’t clog. We usually start with 70% oil to 30% solvent and go from there. Once mixed turn the sprayer on mist and spritz away!

It’s a good idea to work in smallish areas depending on the size of the piece. If the Hemp Oil sits too long on the first coat of paint it will be absorbed and won’t act as a resist.

Have your second color paint premixed before applying the oil so you can jump right into step three.
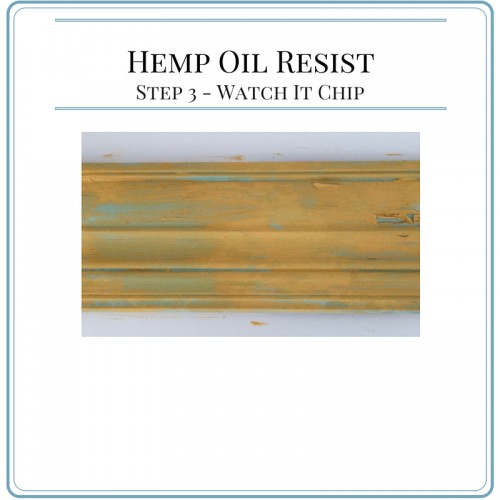
Step 3 – Immediately after applying the Hemp Oil start applying the second color. You will notice the paint will separate and want to resist immediately where the oil is. In this photo you can see the wet paint, and in the section below it is drying and already getting some lift.

The Hemp Oil resists the paint and keeps it from adhering. DO NOT over-work it! We know that it’s hard to not want to crank that paint brush back and forth where the paint is separating, but this separation is a good thing. Step away from the brush and let it do its thing.

As the paint dries you will start to see it chip off. As in the picture below.
Remember, if you over work the paint it will not resist. The photo below shows example 2. When we got to step 3 we overworked the second coat. Oops not a chip in sight.

Sigh…what to do now? Just try again, starting with step 2, but reverse the colors.

On top of the overworked coat of French Enamel, we spritzed again and painted another coat of Ironstone. This time we didn’t over brush.
You can see the paint is immediately resisting.
Since this is a sample board we decided to again play with overworking the brush. The rosette on the right side is the overworked one, while the left side was left to chip.

Finally we get to the finish coat.
Step 4 – When the final coat has dried, lightly sand the surface where you see chipping. You can also use a putty knife, but be gentle! Dust off the surface, and then you can seal with a topcoat like Furniture Wax or MMS Tough Coat Sealer.

The dresser below was done with a base coat in MMS Ironstone and a top coat of MMS Artissimo.

Remember, chippiness is not predictable so try not to get frustrated! Just go with the flow. If you only want a little chipping, make certain you go light on the Hemp Oil.

We even did the lovely large cabinet (above) using a resist and it looks so authentic you can’t tell that it’s a new paint job.
Next week on making patina you’ll see how to get the chippy look with a special ingredient using Annie Sloan Chalk Paint®.
If you have any questions we are always available via phone or email. Or check in with any of our retailers for an in-person demonstration. Caio, until next time…
